PIC16F877 pic16f876 via the serial port and control the servo motor with 8 additional program code in addition have prepared for the test sample c language
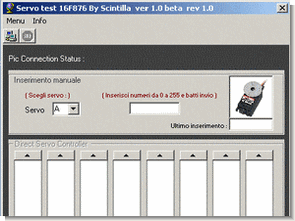
To follow this project need to arm themselves demoboard 16F876 (or 16f877), the RS232 module, a PC serial port and 8 servants well. If you do not have home-8 servants, you can also use a door solo.Alle B of the PIC will be connected wireless signal of the servants and the rs232 module connects to the pins RC6 and RC7. You can connect the PC to the serial form rs232, program the PIC and install the control program in your PC.

Connections have to do this: Connect the pin port B line to the control of the 8 servi.Collegare the pin RC6 (17-pin serial Tx) to form rs232 and pin RC7 (18-pin serial Rx) always form rs232.Alimentate demoboard is that the module rs232.I servants should feed them separately because their absorption in the stream may be such as to reset the pic.
executable code to be included in the pic. You have to program the pic with the flag XT and power up timer activated, leave off all other flags. Source code written in C for the pic. I preferred to leave it in a way so as not to fill the page with a list a little lunghetto. PC program Servo Test in ZIP format. Designed by Emanuele Secchi, so you have to unpack and install on your PC.
Source: http://www.fisertek.it/index_000032.html PICmicro the Servo Motor Serial Port Control Project souce code etc. files Alternative link:


L6203 L297 H-Bridge Stepper Motors Driver Circuit
Now is a year that I’m working on CNC (numerical control machines) and after various experiences realize this bridge H stepper motor capable of driving motors up to 4 amper type pure bipolar (4 wires) or up to 5 7 amper for engines configured bipolar series. (6-8-wire). The current minimum payable is approximately 500 mA and with this range of current deck covers all the needs of cnc amateur pilot and industrial.