
An Arduino Nano-based spot welding machine for spot welding 18650 batteries. All the details of the Arduino spot welding machine project, including 3D drawings, are shared.
The spot welding machine can be used to spot weld 18650 batteries. It uses a 12V car battery as its current source. A 40Ah battery provides sufficient current to weld well with nickel strips between 0.15mm and 25mm. You will need a more powerful battery for thicker nickel strips.
The battery welding machine produces dual pulses, where the first pulse is by default 12% of the second pulse. The duration of the main pulse can be adjusted by the encoder, the rotary encoder, and is displayed on the screen in milliseconds, allowing you to precisely set the duration.
It can be adjusted between 1 and 100 ms by default. (Adjustable up to 500 ms from the system menu)
Two Current Pulses
Contents
The Arduino spot welding machine works by sending high-current pulses. A superior feature of the Arduino spot welding machine board compared to classic battery spot welding circuits and methods is the application of two current pulses.
The first current pulse softens the nickel, ensures better contact between the probes, and burns away oxide and dirt from the nickel; this is a short pulse.
The second, longer current pulse enables the welding process. In other words, the first current pulse allows for a solid spot weld with the second current pulse. We see it as a single current pulse, but there are actually two.
Arduino Spot Welding Machine Features
Auto Pulse: Here you can turn Auto Pulse on and off and adjust the delay time. The “Auto Pulse” feature automatically activates a pulse after a 2-second delay (default) when both welding tips touch the nickel strip. When activated, you cannot use the foot pedal to activate the pulse.
When activated, “AUTO” appears in the lower right corner of the main screen; when deactivated, “MANU” appears.
Battery Alarm: You can set the voltage at which the battery alarm will be triggered (default 11V). If the alarm is triggered, the spot welding machine will stop working and display a low battery warning until it reaches a voltage higher than the set battery alarm (usually after charging your battery).
Short Pulse: You can set the duration of the short pulse as a percentage (1…100). For example, if it is set to 10% and the main pulse is 20ms, the sequential pulse will be 2ms. The short pulse will always be at least 1ms, regardless of the percentage value set. So, if the main pulse is set to 5ms and the short pulse to 10%, it will still be 1ms and not 0.5ms.
Improvements in Arduino Battery Spot Welding Device V4 Version:
Buzzer: With the buzzer, alarms will not only be displayed on the screen but also audible to the user. This makes it much easier to notice an alarm while working with the soldering machine.
Temperature Sensor: The temperature sensor triggers an alarm when the temperature reaches 65°C and disables the soldering to protect the soldering machine from overheating.
Additional 470µF Capacitor: It is now possible to use soldering times of up to 100-150ms with two 470µF capacitors without the risk of the Arduino Nano restarting. Restarting could occur in V3 with very long soldering times due to the voltage on the Arduino Nano dropping to very low levels during soldering.
SMD Mosfet Driver: The Mosfet driver chip has been changed from a socket-mounted version to an SMD version soldered directly to the PCB. The SMD version eliminates potential contact issues that could occur in the through-hole version if it is not properly plugged into the socket.
SMD MOSFETs: The MOSFETs have been changed from through-hole to SMD. This will eliminate the problem of MOSFET pin failure at very high currents in the V3.
New Aluminum Parts: The MOSFET board still uses two aluminum parts, but the parts are flat and both are the same size. This makes them much easier for DIY users to manufacture or modify.
Stronger Protection Diodes: The protection diodes under the MOSFET board have been replaced with a much stronger version. They are rated for the same current as those in the V3, but can withstand much higher short-term peak currents and have better heat dissipation because they are physically larger.
Standby Feature: After 5 minutes of inactivity, the Spot Welding Machine will enter standby mode, and the footswitch and AutoPulse will be disabled while in standby mode.
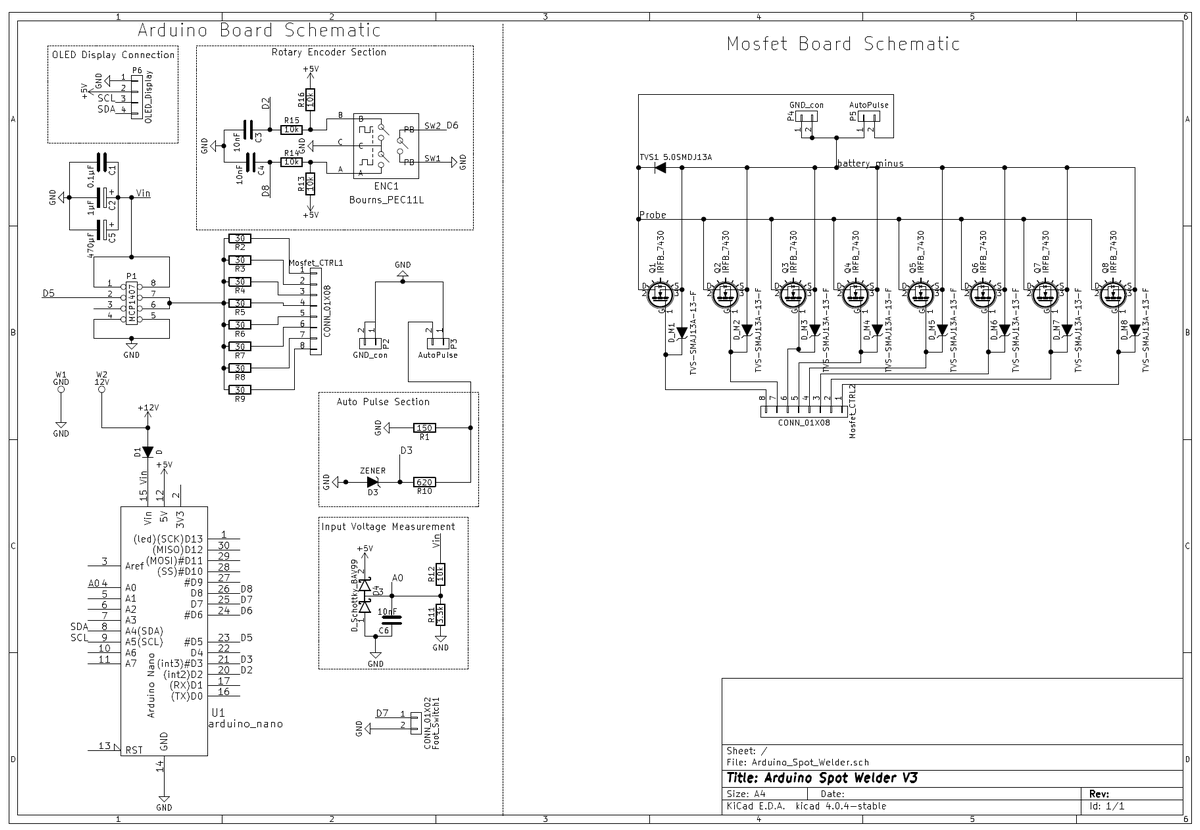
Arduino Spot Welding Battery Spot Welding Circuit Diagrams (v3, v4)

Recommended power source battery: car battery 12V 40Ah 440A (or 440CCA) / Lipo battery: 3s 5000mAh with minimum 60C
Power source cable: 16mm², max. 50 cm long each
Recommended power source material: 0.1 mm to 0.25 mm nickel strip
Source github.com/KaeptnBalu/


