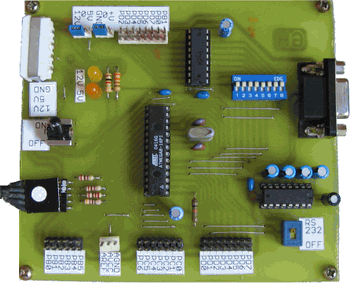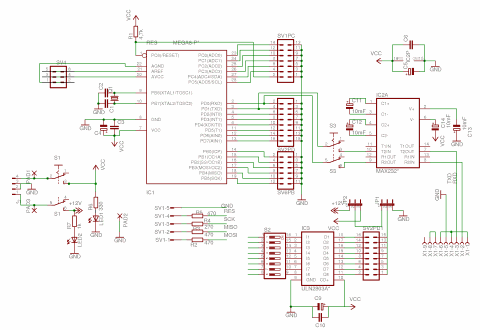
In the folowing page I will present you an open source development board for ATMEGA8 builded especialy for Linux users. This development board is perfect for all the newbies that want to learn about AVR Microcontrollers or want to build some nice projects with it.
ATMEGA8 DevBRD contains:
*ISP programer
*RS232 comunication (serial port)
*HIGH POWER VOLTAGE control
*ON/OFF circuit
*All pins are marked
*PC power jack
Design: When we builded this development board we had in mind that it will have to control also some powerfull motors. That’s why ther’s no power source on the board. As a power source I’m using an old PC power suply.

Testing: First you need to prepare your Linux system. For doing that make sure you have the folowing packages instaled:
*uisp -for writing the program to the microcontroler
*gcc-avr -for compiling programs
*avr-libc -AVR C library for gcc-avr
Also make sure that you have all the kernel modules loaded and that your user have write acces to the parallel port.
Open a terminal window and give the folowing commands:
sudo modprobe parport-pc
sudo modprobe parport
sudo modprobe ppdev
sudo chmod 666 /dev/parport0
Test that evrything is working with folowing command:
uisp -dlpt=/dev/parport0 -dprog=dapa ‘If ATMEGA8 is found you are OK
Use the onboard 4MHz crystal by programing ATMEGA8 fuses:
uisp -dlpt=/dev/parport0 -dprog=dapa –wr_fuse_l=0xee ‘3-8MHz
To use internal 1MHz RC oscilator:
uisp -dlpt=/dev/parport0 -dprog=dapa –wr_fuse_l=0xe1
Programming: After you compiled your program you need to load it into the microcontroller:
uisp -dlpt=/dev/parport0 –erase -dprog=dapa ‘Erase old program
uisp -dlpt=/dev/parport0 –upload if=name.hex -dprog=dapa -v=3 –hash=32 –verify
‘Load new program “name.hex”
Source: http://www.minipop.org/ Atmega8 Experiment Development Board eagle cad pcb schematic alternative link:
Şifre-Pass: 320volt.com
Published: 2008/06/14 Tags: atmega8 projects, avr development board, microcontroller projects
MC145026 and MC145027 Control Relay Control
This remote control, I zkonstruoval for the purposes of remote travel lift in its assembly. The output of the receiver is not solved through 4 relay, so it can be used to almost anything. The core of the entire remote control circuits for the remote control MC145027 (receiver) The transfer of information obstarávají modules SAW433-TX and RX-BC-NBK433, which are factory and work reliably on the first engagement. Their reach is the open area to 1 kilometer (using a directional antenna is alleged to 2 kilometers)