A nice study with the necessary information and sample CCS C C# software to connect your circuits prepared with PIC Microcontrollers to wireless networks will be very useful especially in your control projects over the internet.
First of all, I would like to state that in this source, you will not find the use of all the features of this module, but only how to implement a data sending and receiving application from start to finish. After obtaining the basic information about the use of the module from this source, you can examine all its other features by examining its catalog.
While preparing the source, I used the user manual of the WiFly GSX RN-131G module. PIC18F4620 was used as the microcontroller and the codes were written with CCS C language. On the computer side, the codes were written with C#.
Module Features;
The WiFly module is a product developed by Roving Networks for TCP/IP applications. You can connect to a wireless network using only the Power, Gnd, Rx and Tx pins and receive and send data via UART.
Supports 2.4GHz IEEE 802.11b/g protocol.
Ultra low power consumption (4uA in sleep mode, 40mA Rx, 210mA max Tx)
Small size (3.5 x 28.5 x 37mm)
UART and SPI hardware interfaces
8 analog sensors
Real-time clock for auto-sleep and auto-wake
3.3V DC or 2-3V battery power supply with built-in boost regulator
Adhoc connection support
WiFi authentication – WEP-128, WPA-PSK (TKIP), WPA2-PSK (AES).
Internal network applications – DHCP, UDP, DNS, ARP, FTP, TELNET, HTTP
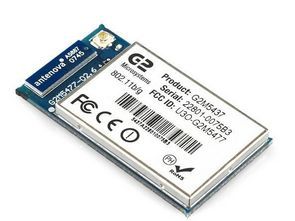
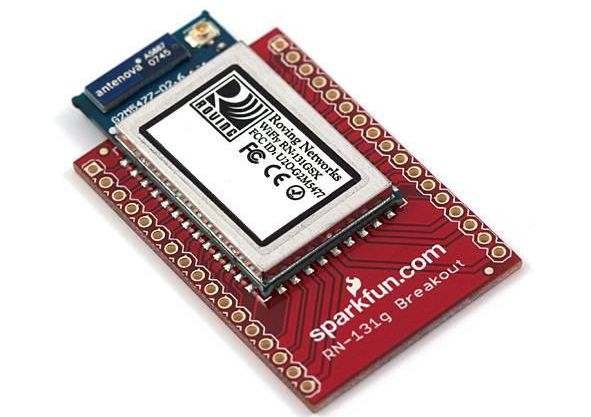
Module we will use in the circuit:


With this breakout board, it is very easy to solder the pins and use the module on a breadboard. 2) Powering the Module There are two ways to power the module.
DC Source; Apply 3.3 V voltage to VDD-BATT (pin 20) and VDD-IN (pin 21) pins. Connect 3.3V-RIN (pin 18) and GND (pin 19) pins to ground.
With battery; Apply a voltage between 2V – 3.3V (can be 2 AAA batteries connected in series) to VDD-BATT (pin 20) pin. This time, VDD-IN (pin 21) will be left empty. Connect 3.3V-ROUT (pin 17) pin to 3.3V-RIN (pin 18). This connection will activate the module’s built-in boost regulator. Finally, GND (pin 19) pin will be connected to ground.
WARNING: Applying any voltage above 3.3V to the VDD pins will cause permanent damage to the module. Applying 3.3V voltage to these pins while the PIO pins are set as output will cause permanent damage to the module.
The module is ready for use after powering up. It is enough to connect the Rx and Tx pins. 3) Reset is an active low input and is optional. You do not have to connect it for the module to work. 4) Do not forget to make a common ground connection when connecting the UART to a computer or any microcontroller.
If your microcontroller works with 5V instead of 3.3V, do not forget to change the voltage level for the Rx, Tx pins. You can use the Max232 integrated circuit for this process. Do not forget to pay attention to the voltage levels when connecting to the computer. 5) Status LEDs PIO 4, 5 and 6 pins can be connected to external LEDs to monitor the connection and data flow status.
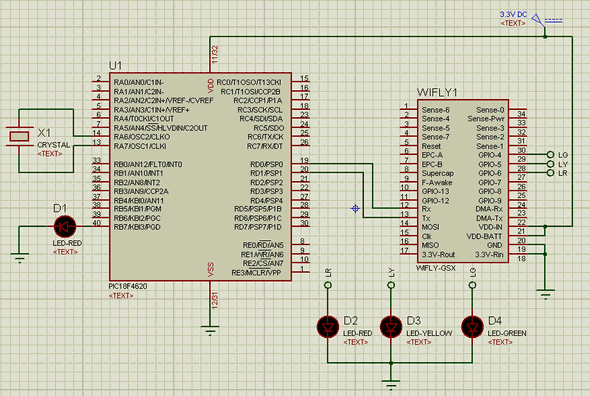
We will write our PIC program according to the circuit below. I had an 18F4620 that I could run with 3.3V, so I used it in the circuit. You can use any PIC that works with 3.3V. If you are going to use a model that works with 5V, definitely do not connect the Rx, Tx pins directly to the module. Definitely reduce the voltage level with an integrated circuit such as MAX232.
@Recai Sinekli
recaisinekli.com
recai@recaisinekli.com
Şifre-Pass: 320volt.com
Spot lamp illuminated magnifying glass project
First, this project has no intention of making the places I’ve traveled quite a bit to buy a simple büyülteçl but the prices are too high for the lamp lens down from $ 100 I could not find anywhere.
I was a student that I (student = $ 0 :)) just magnifying bought earlier that I received spotlights price 1tl in a corner stood my hands on an old UFO body iron and screw portions passed me by combining them, at least my job to see to do anything I tried Akash, I remember my I started to try it one night came 20:00: I’ve completed 00 and took a comfortable sleep 🙂