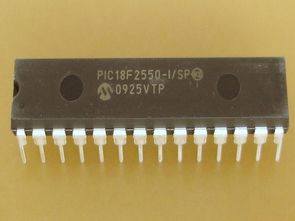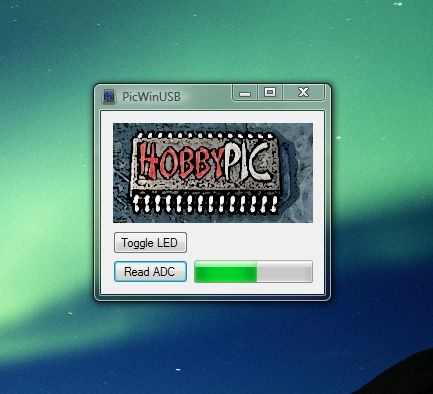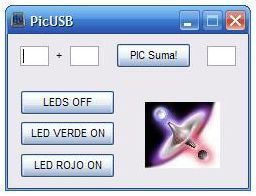
İki adet temel uygulama bulunuyor kaynak ccs c kodları bilgisayar programları gerekli diğer dosyalar var. PIC18F2550 Usb led uygulamalarından birisi led aç kapa yapıyor ayrıca kaynak Visual C# kodlarıda var. Diğer uygulama ise toggle led ayrıca acd`de okuyor bilgisayar yazılının kaynak kodları var fakat hangi program ile hazırlandığından emin değilim galiba asambler ile yazılmış
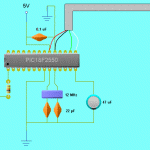
Uygulamaları çalıştırmak için bred bord üzerine kurabilirsiniz ya da test devrelerini kullanırsınız ya da aşağıdaki devreyi kurabilirsiniz bu şekilde şematik çizimler yeni başlayanlar için faydalı oluyor
devre şemasında kristal 12mhz görünüyor bunu yazılıma göre değiştirmelisiniz ayrıca usb kablonun besleme ve data uclarından emin olun herzaman kırımızı + olmayabilir ya da siyah şase olmayabilir 😉 zaten entegre pahalı zarar gelmesin
CCS C PIC18F2550 Usb toggle led;

CCS C yazılım içeriği;
///////////////////////////////////////////////////////////////////////// //// PicWinUSB.c //// //// //// //// Este ejemplo muestra como desarrollar un sencillo dispositivo //// //// USB con un microcontrolador PIC de la serie 18Fxx5x. //// //// El dispositivo hace toggle de un led cuando se le envia la //// //// orden desde el PC, y lee el conversor A/D enviando el valor //// //// obtenido al PC. Esto lo realiza haciendo uso del Driver //// //// WinUSB incluido en Vista y compatible con XP. A diferencia //// //// del ejemplo PicUSB, de esta misma página, que lo realizaba con //// //// el driver de Microchip, mchpusbapi.dll incompatible con Vista. //// //// //// //// Realizado con el compilador CCS PCWH 4.057 //// //// //// //// Por: Jaime Fernández-Caro Belmonte [email protected] //// //// //// //// http://www.hobbypic.com //// ///////////////////////////////////////////////////////////////////////// #include <18F2550.h> #fuses HSPLL,NOWDT,NOPROTECT,NOLVP,NODEBUG,USBDIV,PLL5,CPUDIV1,VREGEN #use delay(clock=48000000) #define USB_HID_DEVICE FALSE //disabled HID #define USB_EP1_TX_ENABLE USB_ENABLE_BULK //turn on EP1(EndPoint1) for IN bulk/interrupt transfers #define USB_EP1_RX_ENABLE USB_ENABLE_BULK //turn on EP1(EndPoint1) for OUT bulk/interrupt transfers #define USB_EP1_TX_SIZE 2 //size to allocate for the tx endpoint 1 buffer #define USB_EP1_RX_SIZE 2 //size to allocate for the rx endpoint 1 buffer #include//Microchip PIC18Fxx5x Hardware layer for CCS's PIC USB driver #include //Descriptors and USB configuration #include //handles usb setup tokens and get descriptor reports #define LED PIN_B0 #define LED_ON output_low #define LED_OFF output_high void main(void) { int8 iBuff[2]; //buffers int8 oBuff[2]; setup_adc_ports(AN0); setup_adc(ADC_CLOCK_INTERNAL); set_adc_channel(0); LED_OFF(LED); usb_init(); usb_task(); usb_wait_for_enumeration(); while (TRUE) { if(usb_enumerated()) // PicWinUSB is enumerated? { if (usb_kbhit(1)) // EP has data? { usb_get_packet(1, iBuff, 2); // Read 2 byte packet from EP 1 if (iBuff[0] == 0) // Led_Mode { if (iBuff[1] == 1) output_toggle(LED); // Toggle LED } if (iBuff[0] == 1) // ADC_Mode { oBuff[0] = 1; oBuff[1] = read_adc(); usb_put_packet(1, oBuff, 2, USB_DTS_TOGGLE); // Send 2 byte packet to EP 1 } } } } }
CCS C ;PIC18F2550 Usb led aç kapa;

PicUSB.c yazılım içeriği;
///////////////////////////////////////////////////////////////////////// //// PicUSB.c //// //// //// //// Este ejemplo muestra como desarrollar un sencillo dispositivo //// //// USB con el PIC18F2550, aunque puede ser facilmente adaptado //// //// para la serie 18Fxx5x. Se suministra el PicUSB.exe, así como //// //// su código fuente para Visual C# 2005, podréis encontrar tb //// //// los drivers para el dispositivo. No se suministra esquema de //// //// conexión puesto que está pensado para ser usado en el GTP USB, //// //// cualquiera de las tres versiones disponibles, si aun no teneis //// //// el programador, podeis utilizar el esquema de ese proyecto. //// //// //// //// Cuando el dispositivo sea conectado al PC, saldrá el asistente //// //// para la instalación del driver. Instala el suministrado junto //// //// a este ejemplo, lo encontrareis dentro de la carpeta Driver. //// //// Una vez instalado podreis usar el PicUSB.exe para encender o //// //// apagar el led bicolor del GTP USB, y para realizar la suma de //// //// dos números introducidos. //// //// //// //// Realizado con el compilador CCS PCWH 3.227 //// //// //// //// Por: Jaime Fernández-Caro Belmonte [email protected] //// //// //// //// http://www.hobbypic.com //// ///////////////////////////////////////////////////////////////////////// #include <18F2550.h> #fuses HSPLL,NOWDT,NOPROTECT,NOLVP,NODEBUG,USBDIV,PLL3,CPUDIV1,VREGEN #use delay(clock=48000000) ///////////////////////////////////////////////////////////////////////////// // // CCS Library dynamic defines. For dynamic configuration of the CCS Library // for your application several defines need to be made. See the comments // at usb.h for more information // ///////////////////////////////////////////////////////////////////////////// #define USB_HID_DEVICE FALSE //deshabilitamos el uso de las directivas HID #define USB_EP1_TX_ENABLE USB_ENABLE_BULK //turn on EP1(EndPoint1) for IN bulk/interrupt transfers #define USB_EP1_RX_ENABLE USB_ENABLE_BULK //turn on EP1(EndPoint1) for OUT bulk/interrupt transfers #define USB_EP1_TX_SIZE 1 //size to allocate for the tx endpoint 1 buffer #define USB_EP1_RX_SIZE 3 //size to allocate for the rx endpoint 1 buffer // If you are using a USB connection sense pin, define it here. If you are // not using connection sense, comment out this line. Without connection // sense you will not know if the device gets disconnected. // (connection sense should look like this: // 100k // VBUS-----+----/\/\/\/\/\----- (I/O PIN ON PIC) // | // +----/\/\/\/\/\-----GND // 100k // (where VBUS is pin1 of the USB connector) // //#define USB_CON_SENSE_PIN PIN_B2 //CCS 18F4550 development kit has optional conection sense pin // // Include the CCS USB Libraries. See the comments at the top of these // files for more information // #include//Microchip PIC18Fxx5x Hardware layer for CCS's PIC USB driver #include //Configuración del USB y los descriptores para este dispositivo #include //handles usb setup tokens and get descriptor reports // // Al conectar el PicUSB al PC encendemos el Led Rojo hasta que el dispositivo // halla sido configurado por el PC, en ese momento encederemos el Led Verde. // Esperaremos hasta que se reciba un paquete proveniente del PC. Comprobaremos // el primer byte del paquete recibido para comprobar si queremos entrar en el // modo Suma, donde se realizará una suma de dos operandos, que corresponderan // con los dos bytes restantes del paquete recibido; una vez realizada la suma // enviaremos el paquete con el resultado de vuelta al PC. Si entramos en el // modo Led comprobaremos el segundo byte del paquete recibido para comprobar // si deberemos apagar los leds, encender el verder o el rojo. // #define LEDV PIN_B6 #define LEDR PIN_B7 #define LED_ON output_high #define LED_OFF output_low #define modo recibe[0] #define param1 recibe[1] #define param2 recibe[2] #define resultado envia[0] void main(void) { int8 recibe[3]; //declaramos variables int8 envia[1]; LED_OFF(LEDV); //encendemos led rojo LED_ON(LEDR); usb_init(); //inicializamos el USB usb_task(); //habilita periferico usb e interrupciones usb_wait_for_enumeration(); //esperamos hasta que el PicUSB sea configurado por el host LED_OFF(LEDR); LED_ON(LEDV); //encendemos led verde while (TRUE) { if(usb_enumerated()) //si el PicUSB está configurado { if (usb_kbhit(1)) //si el endpoint de salida contiene datos del host { usb_get_packet(1, recibe, 3); //cojemos el paquete de tamaño 3bytes del EP1 y almacenamos en recibe if (modo == 0) // Modo_Suma { resultado = param1 + param2; //hacemos la suma usb_put_packet(1, envia, 1, USB_DTS_TOGGLE); //enviamos el paquete de tamaño 1byte del EP1 al PC } if (modo == 1) // Modo_Led { if (param1 == 0) {LED_OFF(LEDV); LED_OFF(LEDR);} //apagamos los leds if (param1 == 1) {LED_ON(LEDV); LED_OFF(LEDR);} //encendemos led verde if (param1 == 2) {LED_OFF(LEDV); LED_ON(LEDR);} //encendemos led rojo } } } } }
Kaynak: http://www.hobbypic.com (kapalı)
Şifre-Pass: 320volt.com
Yayım tarihi: 2010/04/23 Etiketler: ccs c projeleri, microchip pic projeleri, PIC18F2550 örnekleri, toggle led, usb kontrol, usb led


güzel dökümanlar için teşekkürler
sanırım usb port ile ilgili bişiler anlamaya başladım
Merhaba
Pic18F2550 usb- Rs232 dönüştürücü devresi hakkında bilgi mevcut mu sayın gevv.
Teşekkürler
Merhaba,
CCS klasörü içerisinde pic18_usb.h ve usb.c dosyalarını göremedim. picwinusb.c dosyasını compile ettiğimde hata veriyor. İnternneten bu 2 dosyayı buldum. Fakat compile ederken “int1 usb_put_packet(int endpoint, int * ptr, int16 len, USB_DTS_BIT tgl);” satırında tgl için ve birçok satırdada bu değişken ile ilgili hata veriyor. Bu header ve c dosyalarının çalışan versiyonları paylaşabilirseniz sevinirim.
Teşekkürler.