Daha önce Erhan kardeşim Atmega8 ile hazırladığı uygulamayı paylaşmıştı (Atmel Atmega8 Nokia 6100 lcd (pcf8833) uygulaması) bende ek olarak faydalı bir örnek daha paylaşacağım kodlar hem microchip dsPIC33FJ128GP hemde Atmel ATmega168 mikrodenetleyicileri ile kullanılabiliyor.

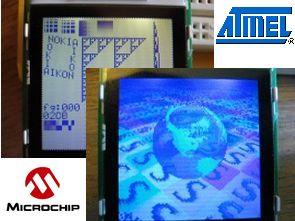
Nokia 6100 test görüntüsü;

Nokia 6100 LCD sürücüsü
Dan Stahlke tarafından yazılmıştır, [email protected], http://www.stahlke.org/dan/nokialcd Sürücü, SparkFun tarafından yazılan bir örneğe dayanmaktadır ve yazı tipi KS0108 kitaplığından alınmıştır (http://en .radzio.dxp.pl) ve (c) Rados³aw Kwiecieñ, [email protected] Bu kod, ücretsiz veya ticari herhangi bir amaç için kullanılabilir, ancak hiçbir şekilde ima edilen hiçbir garanti yoktur.
Bu paket, Nokia 6100 LCD için sürücüleri içerir. Sürücü yalnızca SparkFun’un yeni Epson birimiyle test edilmiştir (Çin klonu, koruyucu kapakta kırmızı şerit, kahverengi izli yeşil PCB). Philips veya daha eski Epson yongaları ile de çalışması gerekir, ancak kaçınılmaz olarak bazı düzeltmelere ihtiyaç duyacaktır (özellikle LCD_Y_OFFSET değişkeni muhtemelen sıfıra ayarlanmalıdır). Diğer yonga setleriyle çalışmasını sağlarsanız lütfen bana bildirin. LCDInitController işlevinde tanımlanan kontrast ayarını da düzenlemeniz gerekebilir.
Bu kod ATmega168 ve dsPIC33FJ128GP yongaları ile test edilmiştir ve her biri için makefile dosyaları eklenmiştir. Makefile dosyaları biraz Linux merkezlidir ve biraz düzenleme gerektirebilir. Alternatif olarak, bu kodu Microchip veya Atmel IDE’ye kolayca getirebilirsiniz. Bu durumda, hangi LCD yonga setini kullandığınızı belirtmek için “-DEPSON” veya “-DPHILIPS” bayrağını C derleyicisine ilettiğinizden emin olmalısınız.
Bu kodu yeni bir MCU’ya taşımak istiyorsanız tek yapmanız gereken, bağlantı noktalarını başlatmak ve 9 bit SPI aktarımı yapmak için kod sağlamaktır. Örnekler için sysconfig-*.c dosyalarına bakın.
Aldığınız grafik rutinleri temel olarak tek tek pikselleri ayarlamak, dikdörtgenleri doldurmak, metin çizmek ve raster bloklar çizmek için işlevlerden oluşur. Çapraz çizgiler veya daireler için bir kod yoktur (bu işlevin bir LCD’de kullanıldığını en son ne zaman gördünüz?). Daha fazla rutin eklemekten ve bana yamalar göndermekten çekinmeyin. demo_testpattern.c içindeki kod, muhtemelen bu sürücüyü nasıl kullanacağınızı öğrenmenin iyi bir yoludur.
Bağlantı şeması için bu dosyanın sonuna bakın. Gerçekten MISO pinini kullanmanıza gerek yok. Bu, şu anda uygulanmayan ekrandan okumak için kullanılır. Bunu dışarıda bırakırsanız, MOSI ile LCD DIO pimi arasında 1k direncini tuttuğunuzdan emin olun. DIO pimi hem giriş hem de çıkıştır ve direnç, hem LCD hem de MCU’nun aynı anda çıkış yaptığı durumlarda güvenlik sağlar.
Bu ekranlarla yapılabilecek bazı şeyleri gösteren üç demo mevcuttur. Test modeli demosu, sürücünün düzgün çalışıp çalışmadığını kontrol etmenin bir yoludur. İçinde karşılaştırabileceğiniz bir fotoğraf var. Ekranım, periyodu dört piksel olan dikey kesikli çizgilerle başa çıkamadı. Fotoğrafın sağ tarafındaki şeridin nedeni budur. Aynı nedenden dolayı Sierpinski üçgeninin altında da bir miktar beneklenme vardır. Küre demosu, dönen bir karo zemine karşı şeffaf dönen bir küre gösteriyor (bu bana 90’larda insanların yaptığı demoları hatırlattı). Bu demo ATmega168’de çalışmayacak, en az PIC24 veya dsPIC kadar güçlü bir şeye ihtiyacı var.
- Makefile.ATMEGA168 ATmega168 çipi için Makefile
- Makefile.PIC33F dsPIC çipi için Makefile
- demo_globe.c Yarı saydam dönen bir küre görüntüler
- demo_scroll.c Kaydırma özelliğinin demosu
- demo_testpattern.c Sürücünün düzgün çalıştığından emin olmak için bir test modeli
- nokialcd_controlcodes.h LCD ekran için düşük seviyeli kontrol kodları
- nokialcd_driver.c Temel LCD sürücü yordamları
- nokialcd_driver.h Yukarıdakiler için başlık dosyası
- nokialcd_font.c Yazı tipi özelliği
- nokialcd_font.h Yukarıdakiler için başlık dosyası
- nokialcd_io.h Temel IO yordamlarını tanımlar
- nokialcd_scroll.c Kaydırma özelliği
- nokialcd_scroll.h Yukarıdakiler için başlık dosyası
- sysconfig-atmega168.c ATmega168 için başlatma ve IO rutinleri
- sysconfig-pic33f.c dsPIC33f için başlatma ve IO rutinleri
- testpattern.jpg Test modelinin nasıl görünmesi gerektiğinin resmi
### dsPIC33FJ128GP için kablolama ###
G/Ç sürücüleri ve yonga yapılandırması sysconfig-pic33f.c’dedir ve makefile, Makefile.PIC33F’dir.
Çip, 4x PLL ile 10MHz XTAL kullanacak şekilde yapılandırıldı, yani 40 MIPS’de çalışıyor.
B11 => LCD RST
B12 => LCD DIO
B13 => B12 1k direnç üzerinden
B14 => LCD SCK
B15 => LCD Sürekli
### ATmega168 için kablolama ###
GÇ sürücüleri ve yonga yapılandırması sysconfig-atmega168.c’dedir ve makefile, Makefile.ATMEGA168’dir.
Çip, 8MHz dahili osilatörü kullanacak şekilde yapılandırılmıştır. 3.3v’de çalışmamız gerekiyor, bu yüzden çip 10MHz’den daha hızlı çalıştırılamaz.
PD0 => LCD Sürekli
PD1 => LCD CLK
PD2 => 1k direnç üzerinden PD3
PD3 => LCD DIO
PD4 => LCD SIFIRLA
Nokia 6100 LCD driver
Written by Dan Stahlke, [email protected], http://www.stahlke.org/dan/nokialcd The driver was based upon an example written by SparkFun, and the font was taken from the KS0108 library (http://en.radzio.dxp.pl) and is (c) Rados³aw Kwiecieñ, [email protected] This code can be used for any purpose, free or commercial, but there is no warranty implied whatsoever.
This package contains drivers for the Nokia 6100 LCD. The driver has only been tested with the new Epson unit from SparkFun (Chinese clone, red tab on protective cover, green PCB with brown traces). It should work with the Philips or the older Epson chips too but will inevitably need some fixes (in particular the LCD_Y_OFFSET variable should probably be set to zero). If you get it to work with other chipsets please let me know. You may also have to edit the contrast setting which is defined in the LCDInitController function.
This code has been tested with the ATmega168 and dsPIC33FJ128GP chips, and makefiles are included for each. The makefiles are a bit Linux-centric and may need some editing. Alternatively, you could easily bring this code into the Microchip or Atmel IDE. In this case you must make sure to pass the “-DEPSON” or “-DPHILIPS” flag to the C compiler to tell the code which LCD chipset you are using.
If you want to port this code to a new MCU all you need to do is provide code to initialize the ports and to do a 9-bit SPI transfer. Look in the sysconfig-*.c files for examples.
The graphics routines you get basically consist of functions for setting individual pixels, filling rectangles, drawing text, and drawing raster blocks. There is no code for diagonal lines or circles (when is the last time you have actually seen this functionality used on an LCD?). Feel free to add more routines and send me patches. The code in demo_testpattern.c is probably a good way to learn how to use this driver.
See the end of this file for a wiring diagram. You don’t really need to use the MISO pin. This is used for reading from the display, which is not currently implemented. If you leave this out make sure to keep the 1k resistor between MOSI and the LCD DIO pin. The DIO pin is both an input and an output, and the resistor provides safety in the case where both the LCD and the MCU are outputting at the same time.
There are three demos available that show some of the things that can be done with these displays. The testpattern demo is a way to check whether the driver works properly. There is a photograph included that you can compare it to. My display could not cope with vertical dashed lines with a period of four pixels. This is what causes the stripe near the right hand side of the photograph. There is also some speckling under the Sierpinski triangle for the same reason. The globe demo shows a transparent rotating globe against a rotating tiled floor (this reminded me of the demos that people were doing in the 90s). This demo won’t run on the ATmega168, it needs something at least as powerful as a PIC24 or dsPIC.
Here is a description of each file in this package:
Makefile.ATMEGA168 Makefile for ATmega168 chip
Makefile.PIC33F Makefile for dsPIC chip
demo_globe.c Displays a semitransparent rotating globe
demo_scroll.c Demo of scrolling capability
demo_testpattern.c A testpattern to make sure the driver works properly
nokialcd_controlcodes.h The low-level control codes for the LCD display
nokialcd_driver.c Basic LCD driver routines
nokialcd_driver.h Header file for the above
nokialcd_font.c Font capability
nokialcd_font.h Header file for the above
nokialcd_io.h Defines basic IO routines
nokialcd_scroll.c Scroll capability
nokialcd_scroll.h Header file for the above
sysconfig-atmega168.c Initialization and IO routines for ATmega168
sysconfig-pic33f.c Initialization and IO routines for dsPIC33f
testpattern.jpg Picture of what the test pattern should look like### Wiring for dsPIC33FJ128GP ###
The IO drivers and chip configuration are in sysconfig-pic33f.c, and the makefile is Makefile.PIC33F.
The chip is configured to use a 10MHz XTAL with 4x PLL, which means it runs at 40 MIPS.
B11 => LCD RST
B12 => LCD DIO
B13 => B12 through a 1k resistor
B14 => LCD SCK
B15 => LCD CS### Wiring for ATmega168 ###
The IO drivers and chip configuration are in sysconfig-atmega168.c, and the makefile is Makefile.ATMEGA168.
The chip is configured to use the 8MHz internal oscillator. We need to run at 3.3v, so the chip cannot be clocked faster than 10MHz.
PD0 => LCD CS
PD1 => LCD CLK
PD2 => PD3 through a 1k resistor
PD3 => LCD DIO
PD4 => LCD RESET
Kaynak: stahlke.org Alternatif link: Nokia 6100 LCD Sürücü dsPIC33FJ128GP ATmega168
Şifre-Pass: 320volt.com
Yayım tarihi: 2011/01/30 Etiketler: ATmega168, dspic33fj128gp, microchip pic projeleri, nokia 6100, nokia lcd driver